
The SQL Node enables Rayven workflows to interact directly with external SQL databases. It can be used to insert, update, or query data from systems like MySQL, allowing for seamless two-way integration with legacy systems, data warehouses, or cloud.
What It Does
This node connects to a remote SQL database using a provided connection string and executes a specified SQL query. It can be configured to send data from upstream nodes into the database (e.g., insert sensor readings), or to retrieve and return data into the workflow for further processing or display.
It also supports options like auto field insertion and REPLACE INTO queries to simplify dynamic table writes.
Step-by-Step: How to Configure the SQL Node
1. Add the SQL node
Drag the SQL Node onto the workflow canvas from the Data Connectors section.
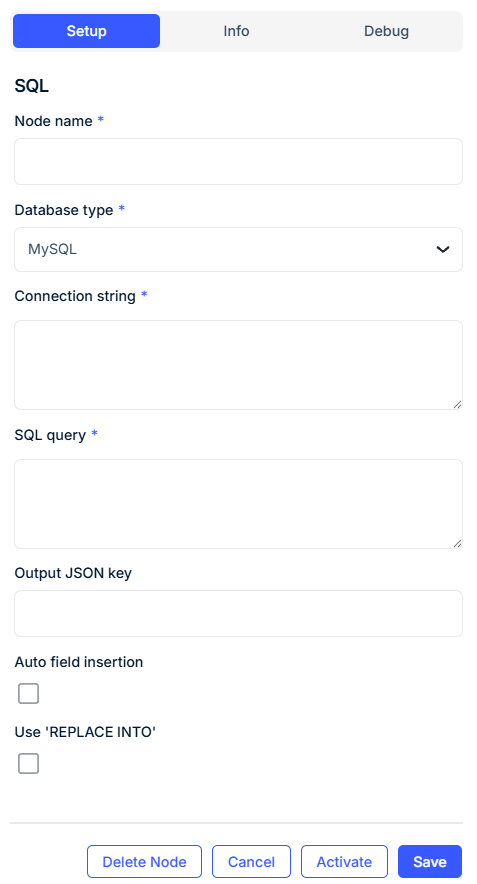
2. Set node name
Name the node for its specific purpose (e.g., "Insert Temperature to MySQL").
3. Select database type
Choose from supported engines (currently: MySQL). Additional engines like PostgreSQL or SQL Server may be added in future releases.
4. Define connection string
Paste the connection string for the external database. Ensure credentials, hostnames, ports, and database names are correctly specified.
Example:
mysql://username:password@hostname:3306/database_name
5. Write the SQL query
Enter a valid SQL statement using standard SQL syntax.
You can inject values from the incoming payload using parameterization or handle them via auto field insertion.
Examples:
INSERT INTO temperature_readings (device_id, temp, timestamp)
VALUES ('', , '');
6. Configure optional behavior
-
Output JSON key: If the SQL query returns results, specify the JSON key where the response will be stored in the output payload.
-
Auto field insertion: Automatically matches payload keys to table column names and builds the SQL query.
-
Use 'REPLACE INTO': Replaces existing rows with the same primary key instead of inserting duplicates (MySQL only).
Configuration Fields
| Field | Requirement | Description |
|---|---|---|
| Node Name* | Required | Name used to label the node in the canvas. |
| Database Type* | Required | Type of database (currently supports: MySQL). |
| Connection String* | Required | URI format connection string for external database access. |
| SQL Query* | Required | SQL statement to be executed. Can be static or parameterized. |
| Output JSON Key | Optional | Key name for storing query results in output payload. |
| Auto Field Insertion | Optional | Automatically builds INSERT statements from payload fields. |
| Use 'REPLACE INTO' | Optional | Switches INSERT INTO to REPLACE INTO for upsert logic (MySQL only). |
Example: Insert Device Temperature into MySQL
Payload Input:
{
  "uid": "device_123",
  "value": 26.7,
  "timestamp": "2025-07-21 15:00:00"
}
Configuration:
-
Database Type:
MySQL -
Connection String:
mysql://user:pass@192.168.1.100:3306/iot_data -
SQL Query:
sqlCopyEditINSERT INTO readings (device_uid, value, ts)
VALUES ('', , ''); -
Output JSON Key:
query_result -
Auto Field Insertion: ❌
-
Use 'REPLACE INTO': ❌
Result:
Data is inserted into the readings table with fields pulled from the incoming payload.
Best Practices
-
Always test connection strings in a secure environment before deploying.
-
Use parameterized SQL or safe templating to avoid SQL injection if payload values come from external sources.
-
Validate that payload field names match the database table columns if using Auto Field Insertion.
-
Enable REPLACE INTO only when row replacement (upsert) is desired and supported by your table schema.
Use Cases
-
Ingest live IoT sensor data into a remote SQL database.
-
Log system events or alerts into external reporting databases.
-
Retrieve calibration or configuration values from a legacy system on-demand.
-
Integrate with customer-owned databases for historical queries or audit trails.
FAQ
Q: What happens if the SQL query fails?
A: The workflow will halt at this node. Check the logs for detailed error messages—typically connection or syntax errors.
Q: Can I use SQL SELECT to retrieve data from the database?
A: Yes. The returned data can be accessed in the output payload using the defined Output JSON Key.
Q: Is connection pooling supported?
A: Not currently. Each execution creates a new connection based on the string provided.
Q: What if I don’t want to write SQL manually?
A: Use Auto Field Insertion, and the node will construct a basic INSERT INTO statement based on the payload’s keys and values.