![Ravyen Transparent 1390x426-1.png]](https://insights.rayven.io/hs-fs/hubfs/000%20-%20Rayven/Rayven%20Brand%20Assets/Rayven%20Logos/Ravyen%20Transparent%201390x426-1.png?height=50&name=Ravyen%20Transparent%201390x426-1.png)
What Is a Link Widget?
A Link Widget is a clickable user interface element that directs users to another location:
-
A different dashboard within the same solution
-
A different solution in the account
-
An external HTTPS link (e.g., documentation, third-party portals)
This widget improves interface interconnectivity, streamlines workflows, and ensures users have fast access to related views and resources.
Step-by-Step: How to Configure the Link Widget Node
-
Add the node to your workflow
-
Drag the Link Widget Node from the Controls section into your canvas.
-
-
Open configuration
-
Double-click the node to access the configuration window.
-
Input connections are optional unless using a dynamic URL via JSON.
-
-
Configure Widget Basics
-
Widget Name: Display label shown on the button (e.g.,
Open Details,More Info). -
Link Type: Choose one of the following:
-
Dashboard – link to another dashboard in the current solution
-
External – link to an HTTPS URL
-
Solution – link to a different Rayven solution in your account
-
-
-
Define the Destination
-
If Dashboard is selected: choose the target dashboard from the list.
-
If External is selected:
-
Enter a fixed URL (e.g.,
https://support.example.com) -
Or use a dynamic value with a JSON key in this format:
[[url_key]]
-
-
If Solution is selected: select a target solution from the dropdown.
-
-
Customize Appearance
-
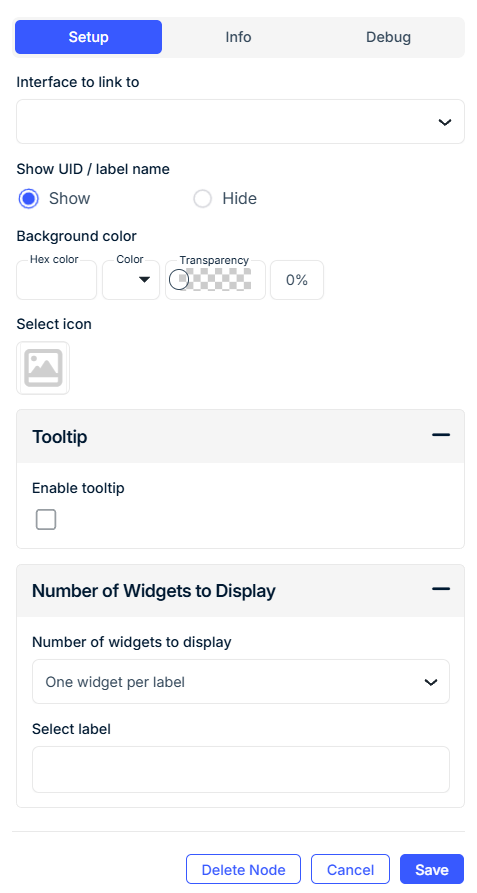
Show UID / Label Name: Toggle to show device ID or label on the widget.
-
Background Color: Choose a color or enter a hex code (e.g.,
#0066cc). -
Transparency: Set a percentage (e.g.,
0%for solid,50%for semi-transparent). -
Select Icon: Choose an icon from the built-in library to represent the link visually.
-
-
Enable Tooltip (optional)
-
Check Enable Tooltip and enter descriptive Tooltip Text.
-
-
Set Grouping and Display Options
-
Select Label: Choose a device label (e.g.,
Zone,Location) to group widgets. -
Grouped Display Mode:
-
No Grouping: One widget per device
-
Group by Label Value: One widget per label value
-
Group by Label Name: One widget for all devices in the group
-
-
Number of Widgets to Display: Limit how many widgets appear (optional).
-
Configuration Fields
General Settings
| Field | Requirement | Description |
|---|---|---|
| Widget Name* | Required | The display name shown on the link widget. |
| Link Type* | Required | Type of link: Dashboard, External, or Solution. |
| Dashboard to Link To | Required if Dashboard |
Target dashboard in the current solution. |
| External Link | Required if External |
A direct URL or dynamic [[json_key]]. |
| Project to Link To | Required if Solution |
Destination solution in the account. |
| Show UID / Label Name | Optional | Show the device UID or label name next to the widget. |
Appearance
| Field | Requirement | Description |
|---|---|---|
| Background Color | Optional | Use a hex code or color picker to set the widget background. |
| Transparency | Optional | Adjust background opacity (0% = solid, 100% = invisible). |
| Select Icon | Optional | Choose an icon to add visual context to the button. |
Tooltip
| Field | Requirement | Description |
|---|---|---|
| Enable Tooltip | Optional | Show tooltip on hover. |
| Tooltip Text | Optional | Short descriptive message displayed in the tooltip. |
Grouping & Display Logic
| Field | Requirement | Description |
|---|---|---|
| Select Label | Mandatory (if grouped) | Device label used for filtering or grouping. |
| Grouped Display Mode | Mandatory | - No Grouping: One widget per device - Group by Label Value: One widget per label value - Group by Label Name: One widget for all devices |
| Number of Widgets to Display | Optional | Cap how many link widgets are shown when grouping. |
⚠️ Device labels must be created in the Workspace before they will appear in the dropdown.
Use Cases
-
Link from a summary dashboard to a specific device or analytics view.
-
Create fast access to third-party platforms (e.g., documentation, portals).
-
Navigate between operational, configuration, and reporting dashboards.
Best Practices
-
Use consistent widget styling (icons, colors) to establish clear navigation patterns.
-
Add tooltips to clarify link destinations, especially when linking externally.
-
Use grouping modes to dynamically generate links per zone, category, or location.
-
Use
[[json_key]]format to dynamically drive external URLs via payload values.
Frequently Asked Questions (FAQ)
Q: Can I link to an external site?
A: Yes. Use the External link type and enter an https:// URL or use a dynamic [[url_key]].
Q: How do I link between dashboards?
A: Choose Dashboard as the link type and select the target dashboard.
Q: Can I link across different Rayven solutions?
A: Yes. Select Solution as the link type and choose the target solution.
Q: How do I show different link widgets for different devices?
A: Use Grouped Display Mode with Select Label to render widgets per label value.