
In Rayven.io, Primary and Secondary Tables are essential for organizing and relating your data.
In Rayven.io, Primary and Secondary Tables are essential for organizing and relating your app’s data. This guide walks you through how to create fields (columns) and add records (rows) to structure your data model effectively, enforce rules, and support intelligent workflows and dashboards.
Use Cases
-
Add new fields like Asset Type, City, or Status to your primary table.
-
Insert new records into a secondary table (e.g., maintenance logs, operator notes).
-
Enforce data validation rules such as uniqueness, required fields, and visibility.
-
Create linked records that enhance reporting, filtering, and workflow automation.
How It Works
Each table in Rayven has a Manage View that provides full control over its structure and content.
From the Actions → Manage Your Table menu, you can:
-
Search and filter existing data
-
Add/edit fields (columns)
-
Add/edit rows (records)
-
Configure validation and visibility settings for each field
Step-by-Step Instructions
1. Manage Your Table
-
Go to the Tables Configuration page.
-
Locate the table (Primary or Secondary) you want to manage.
-
Click Actions → Manage Your Table.
-
Use the Search bar to filter and inspect rows.
2. Add a New Column (Field)

To add a new field:
-
Click Add New Column under the Actions menu.
-
Complete the form with these details:
| Field | Description |
|---|---|
| Data Type* | Choose a field type: String, Number, Date, Boolean, etc. |
| Label Type | Choose display mode (e.g., Display Only for read-only fields). |
| Column Name* | This is the user-visible name (e.g., Asset Type, City Name). |
| Link to Interface | Optionally bind the column to a UI widget or form. |
| Hide Column in UI | Prevent this field from appearing in interfaces or dashboards. |
| Required Value | Make this field mandatory for all new rows. |
| Unique Values | Prevent duplicate entries in this column (e.g., for UID, Serial No.). |
Click Save to add the new column.
3. Add a New Row (Record)
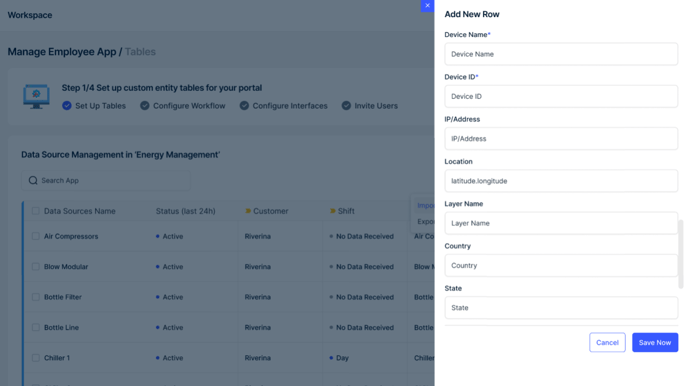
To add a new record:
-
Click Add New Row in the Actions menu.
-
Fill in the form fields:
| Field | Description |
|---|---|
| UID* | A unique identifier (e.g., device_001, user_ABC). |
| UID Display Name | A human-readable label (e.g., “Main Pump A”, “John Smith”). |
| Additional Fields | Populate any custom fields previously defined. |
Click Save to insert the record.
🔁 Tip: Use the Import feature to upload many rows at once using CSV.
Best Practices
-
Use consistent, readable field names (e.g.,
Asset_ID,Install_Date). -
Always define a UID in primary tables to support workflows and relationships.
-
Use Required and Unique flags to ensure clean, reliable data.
-
Hide internal-use fields from dashboards using the Hide Column in UI option.
-
Store fast-growing logs or metrics in secondary tables to keep primary tables lean.
Table Examples
| Table Type | Example Column | Example Row |
|---|---|---|
| Primary | Asset Type (String) | UID: device_001, Asset Type: Chiller |
| Secondary | Maintenance Date (Date) | UID: log_123, Linked Asset: device_001, Status: Passed |
Troubleshooting
Can’t add a column?
Make sure the column name isn’t already in use or reserved.
Duplicate UID error?
Ensure the UID is unique across the entire table.
Field not showing in dashboards?
Verify that “Hide in UI” is not enabled.
Missing required field warning?
Check that all required fields have values before saving the row.
Q&A
Q: Can I modify columns after saving them?
Yes. You can rename, delete, or change column types (with caution) at any time.
Q: What happens if I remove a required field setting?
Future rows won’t be forced to provide that field — existing data remains unchanged.
Q: Can I sort or filter records based on a specific field?
Yes. Use the table's search and filter options or build filters into dashboards.
Q: How can I bulk upload rows to a table?
Use the Import function in the Actions menu to upload a CSV.
Q: What’s the difference between hiding a field and deleting it?
Hiding keeps the field in the table but removes it from user-facing interfaces; deleting removes the field completely.
Q: What’s the difference between Primary and Secondary tables?
Primary tables store core records like assets or users. Secondary tables store related or historical data linked to those records (e.g., logs, readings, assignments).
Q: Can I delete a table column after it’s been used in workflows or dashboards?
Yes, but it's not recommended unless you remove all references to that column first. Deleting a column used elsewhere may break your workflows or visuals.
Q: Can I reorder columns in the table view?
No, the current interface doesn’t support manual reordering. However, columns are displayed in the order they were created.
Q: Can I link a secondary table to more than one primary table?
Each secondary table typically links to one primary table through a foreign key. You can include multiple foreign keys if needed, but it requires clear schema design.
Q: Are there field types for drop-downs or predefined choices?
Yes. Use fields with predefined values or bind a field to a reference table to create a dynamic drop-down menu.
Q: Can I make a field read-only in the UI but still editable via workflows?
Yes. Use the Display Only label type for the UI, but workflows can still write to the field.
Q: How do I ensure data integrity across tables?
Use UID matching, validation rules, and referential linking (e.g., a foreign key column in secondary tables that matches a UID in the primary table).
Q: Can I export table data for external analysis?
Yes. Table data can be exported as CSV files via the interface or through workflow-based export actions.
Q: What’s the best way to handle large time-series data?
Store time-series data in a dedicated secondary table and periodically archive older entries if needed. Use indexed fields like timestamp and device ID for efficient queries.
Q: Can I programmatically update or query table data?
Yes. Use workflows or external API integrations to read/write to tables dynamically.
Next Steps
-
[How to Import Data into Tables]
-
[How to Use Table Data in Dashboards]
-
[Linking Tables to Workflows]
-
[Best Practices for Schema Design]
-
[Setting Up Table-Based Permissions]
Let me know if you'd like this version exported as markdown, PDF, or used as a template for other table-related documentation.